Adverse Event Module
Overview
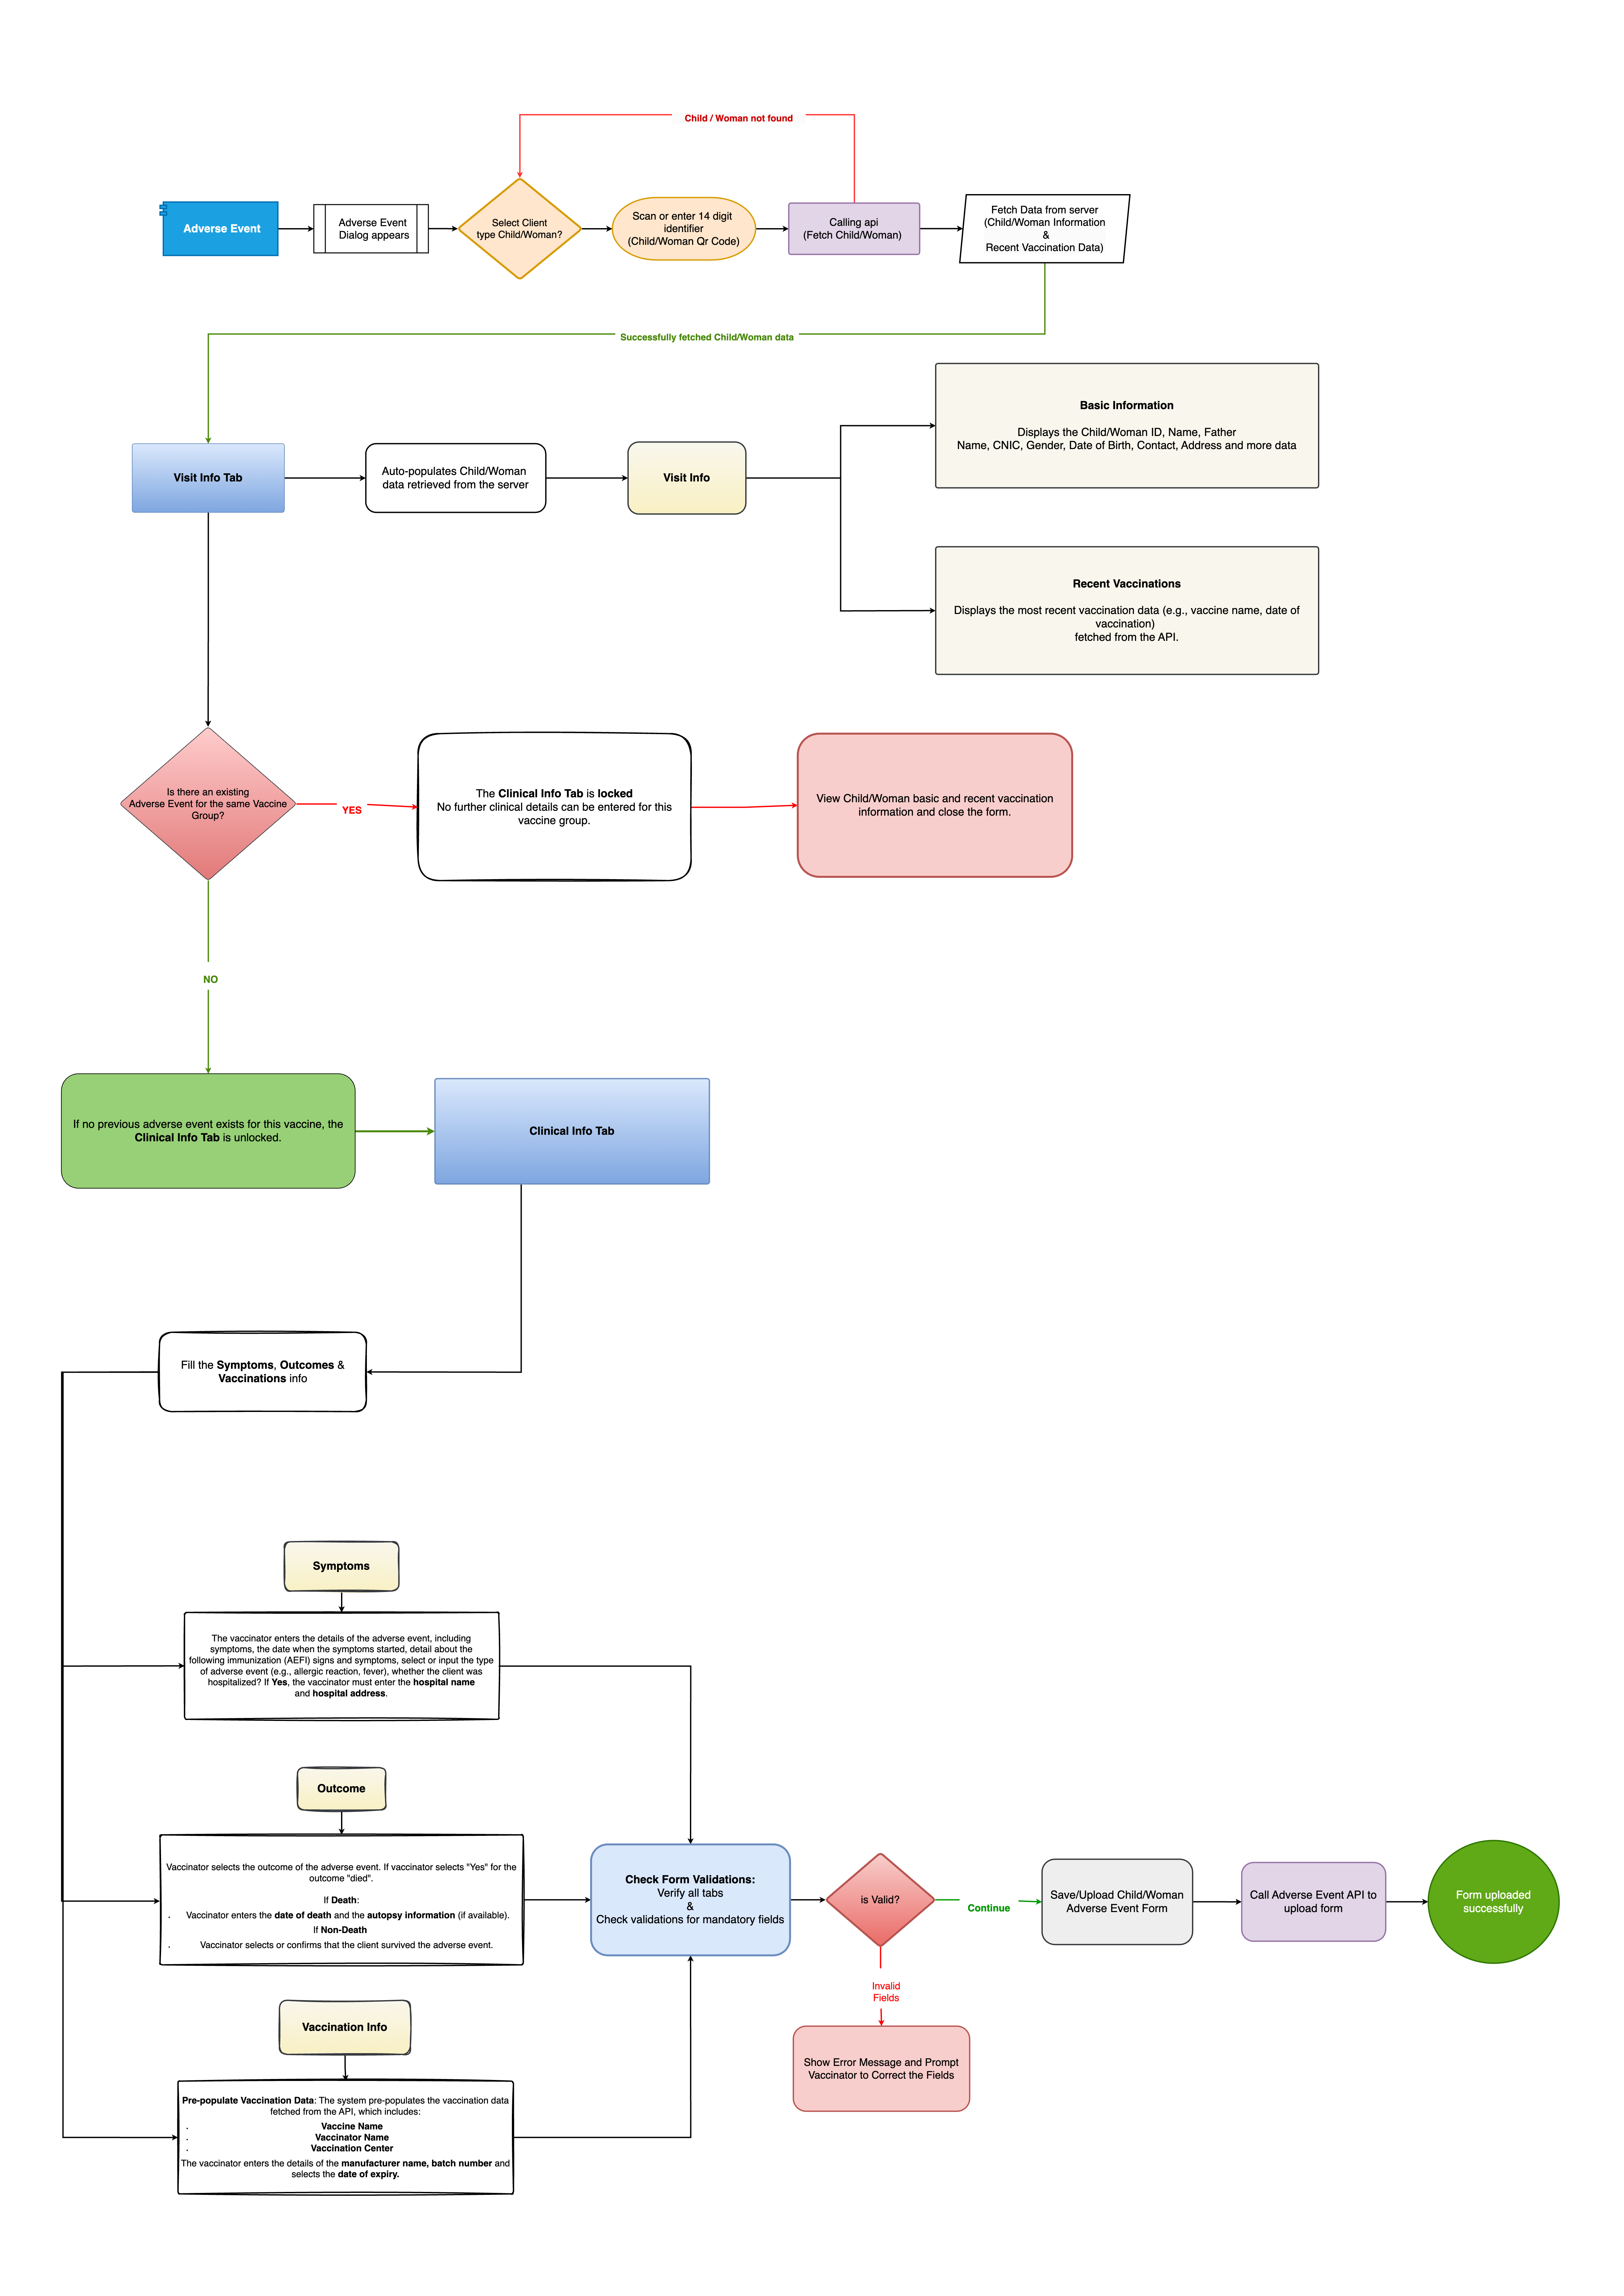
The Adverse Event Module in the ZM app is responsible for tracking and reporting Adverse Events Following Immunization (AEFI). The AEFI form is used to report any negative health events occurring after vaccine administration, ensuring proper documentation and follow-up for patient safety.
Key Features of the Adverse Event Module
1: Adverse Event Form
-
The module allows vaccinators to log any adverse events that occur post-vaccination.
-
The system checks whether the child/woman has already been registered.
2: Patient Search & Identification
The vaccinator can search for a child/woman by:
-
Scanning or entering a 14-digit code (Child/Woman ID).
-
If the child/woman is found, their data is fetched from the server.
-
If not found, an error message is displayed.
3: Patient Information Retrieval
Once identified, the system fetches and displays:
-
Basic Information: Name, Guardian Name, CNIC, Gender, DOB, Contact Details, Address, etc.
-
Recent Vaccination Data: Most recent vaccination details, including vaccine name and date of administration.
4: Checking for Previous Adverse Events
-
If an adverse event for the same vaccine group already exists, the Clinical Info Tab is locked, preventing duplicate entries.
-
If no previous adverse event exists, the Clinical Info Tab is unlocked for data entry.
5: Clinical Info Tab - Adverse Event Documentation
The vaccinator enters details of the adverse event under:
- Symptoms: Includes duration, severity, hospitalization details, and treatment.
- Outcome: Selects the outcome, including whether it was fatal.
- Vaccination Info: Fetches vaccine details (batch number, expiry date, etc.) and allows manual entry if needed.
6: Form Validation & Submission
- The system validates the form for missing or incorrect fields.
- If errors exist, an error message prompts corrections.
- If valid, the form is saved and uploaded via the Adverse Event API.
7: Form Upload Process
- Once validated, the form is uploaded to the server.
- If successful, a confirmation message is displayed.
Process Flow of the Adverse Event Module (Based on Flowchart)
1: Adverse Event Logging
- The vaccinator selects the Adverse Event option in the app.
2: Patient Identification
- The vaccinator searches for the child/woman using a 14-digit ID.
- The system fetches data from the server.
- If not found, an error message is displayed.
3: Displaying Patient Information
- If found, the system displays Basic Information and Recent Vaccination Data.
4: Checking for Existing Adverse Events
- If an adverse event already exists for the same vaccine group:
- The Clinical Info Tab is locked, and no further details can be entered.
- If no previous adverse event exists:
- The Clinical Info Tab is unlocked for data entry.
5: Filling the Clinical Info Tab
The vaccinator enters:
- Symptoms: Event details, hospitalization info.
- Outcome: Selects the severity, including fatality if applicable.
- Vaccination Info: Fetches or manually enters vaccine batch details.
6: Form Validation
- The system checks if all mandatory fields are filled.
- If errors exist, the vaccinator is prompted to correct them.
- If valid, the form is submitted.
7: Uploading the Form
- The system calls the Adverse Event API to upload the form.
- Once successfully uploaded, the form is marked complete.
8: Completion Confirmation
- The form is uploaded successfully, and a confirmation message is displayed.
Flowchart Explanation
The attached flowchart visually represents the Adverse Event Module process:
1: Start: Adverse Event Logging (Blue Box) → The vaccinator initiates an adverse event entry.
2: Patient Identification (Orange Box) → Scans or enters a 14-digit ID.
3: Fetching Data (Purple Box) → Calls the server for patient details.
- If Data Found → Displays Basic & Recent Vaccination Information (Beige Boxes).
- If Data Not Found → Shows an error message (Red Line).
4: Checking Existing Adverse Event (Diamond Box) → Determines if an event was previously logged.
- If Yes → Locks the form (Red Box).
- If No → Unlocks the Clinical Info Tab (Green Box).
5: Clinical Info Entry (Blue Box) → Vaccinator enters Symptoms, Outcomes, and Vaccination Info.
6: Form Validation Check (Blue Box) → Ensures all fields are correctly filled.
- If Invalid → Shows an error message.
- If Valid → Submits the form.
7: Form Upload Process (Grey Box) → Calls API to upload the form.
8: Successful Upload Confirmation (Green Circle) → Displays success message.
Flowchart